Saturday, March 24, 2012

ReportNG + Selenium


ReportNG create better report than TestNG's normal report.

To Start With:

Step 1 : Download reportng-1.1.3.jar and velocity-dep-1.4.jar into classpath

Step 2: Create a testNG.xml file


Sample code for testNG.xml file


Note: In above code TestScripts2 is the class name under test


Step 3: Now right-clicking on that XML file and select "Run as... TestNG suite".


>>The Report generted will be @ test-output/html and are as shown below:


Note: In case you are getting the following error
java.lang.NoClassDefFoundError: com/google/inject/Module
> at java.lang.Class.getDeclaredMethods0(Native Method)


Solution Is -->
1) Disable defaultlisteners , goto Eclipse Project-> Properties -> TestNG -> Diable deafult listeners.
and , 2) Download google-guice-3.0.zip and paste guice-3.0.jar into your classpath.
Now run and check the report in workspace/test-output/html.

Friday, March 23, 2012

Logging in Selenium Webdriver using log4j


Simple four steps to use log4j for logging


Step 1 Add jar file “log4j-1.2.16.jar”
Step 2 Add “log4j.properties” to class path as shown in picture below:


Code for log4j.properties
# Log levels
# Uncomment the following line to enable full loggin for every class
#log4j.rootLogger=trace, stdout, R
log4j.rootLogger=info, stdout, R

# Console appender configuration
log4j.appender.stdout=org.apache.log4j.ConsoleAppender
# Pattern to output the caller's file name and line number.
log4j.appender.stdout.layout=org.apache.log4j.PatternLayout
log4j.appender.stdout.layout.ConversionPattern=%5p [%t] (%F:%L) - %m%n

# Rolling File Appender
log4j.appender.R=org.apache.log4j.RollingFileAppender
# Path and file name to store the log file.
log4j.appender.R.File=./logs/applog.log
log4j.appender.R.MaxFileSize=500KB
# Keep one backup file
log4j.appender.R.MaxBackupIndex=1
# Rolling File Appender layout
log4j.appender.R.layout=org.apache.log4j.PatternLayout
log4j.appender.R.layout.ConversionPattern=%d - %c - %p - %m%n


Step 3 import the log4j.logger


Step 4 usage in code


Note: Copy the log4j.properties in the src location \workspace\ProjectLog4j\src\ log4j.properties .

Sunday, March 4, 2012

Clicking Compose Button in Gmail using Selenium Webdriver

In Case of Selenium Webdriver use the following code to click on compose button in Gmail:

driver.findElement(By.id("Email")).sendKeys("XXXX@gmail.com");
driver.findElement(By.id("Passwd")).sendKeys("password");
driver.findElement(By.id("signIn")).click();

//wait for page to load
driver.manage().timeouts().implicitlyWait(15, TimeUnit.SECONDS);

//this is important to click on any element on gmail page
driver.switchTo().frame("canvas_frame");
//Now , click on compose mail
driver.findElement(By.xpath("//div[contains(text(), 'Compose mail')]")).click();

==========================================================
In Case of Selenium RC use the following code to click on compose button in Gmail:

selenium.clickAt("//div[contains(text(), 'Compose mail')]","50,50");


Friday, January 27, 2012

Using xPath in Selenium

There is no one way to write an xPath statement, but there is good and bad ways.

Things to think about
• Avoid including text in xPath statement as then test won't work in a different language
• Beware of other objects in the page which may use the same attributes
• Always narrow down to a particular code block which can be uniquely identified
Example:


Option1:
//div[@id='list']/table/tbody/tr/td/div[2]/a
Option2:
//div[@id='list']/table/tbody/tr/td/div/a[contains(text(),'Welcome users who')]
Option3:
//div[@id='list']//a[contains(text(),'Welcome users who')]
Option4:
//div[@id='list']//a[contains(@href,'notify.do?user=welcome')]

Option 4 is the best way to identify the link!

Selenium Tutorial to set up a Selenium Grid

This tutorial walks you through the process of setting up Selenium Grid. I am going to first discuss the idea of Selenium Grid.

Selenium Grid is a Selenium derivative that allows the developer/tester to access Selenium Remote Controls without worrying about where the Selenium Remote Controls are. You as a developer/test create your script as you would for Selenium Remote Control and run it as normal. This is good if you want to test a bug with a specific browser but can't have it installed locally like multiple versions of Internet Explorer.

NOTE: Selenium Grid can only be controlled by Selenium Tests in a programming language. You will NOT be able to run Selenium HTML Test suites against it.

1. You will need to download and install the latest Java JRE on your system. You can find this at http://java.sun.com/ .
2. Once you have installed it, open up a command prompt and run java -version. It should look something like the image below.


3. You need to check that you have Apache Ant. If you open up a terminal/command prompt and type ant -version. If it doesnt return an error then you should be fine. If it returns an error you will need to download Apache Ant and expand the archive to a folder on harddrive.
4. You will need to now download Selenium Grid and put that in a folder that is easy to access. Now that we have all the relevant parts installed lets start the grid up.
5. We are going to start up the Selenium Grid Hub first. Open up a command prompt or terminal and navigate to the folder where the Selenium Grid files are stored.
6. From the command prompt run ant launch-hub. This will get the hub running. To see it running put http://localhost:4444/console into a browser and you will be shown a webpage with 3 columns. The first column shows what Environments it can handle, the second column shows what remote controls are available and the third column shows what remote controls are currently running tests. Like the following screenshot


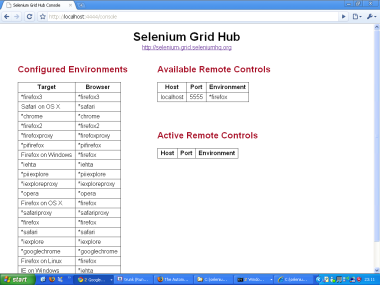
7. Now that we have our hub running, lets start up a remote control. Open up another command prompt or terminal and navigate to the Selenium Grid folder. Run ant launch-remote-control. This will launch a Selenium Remote Control for handling Firefox on your OS on port 5555
8. We now have a Selenium Grid up and running! Lets run some tests against it.
9. To setup an node for Internet Explorer you need to run it as ant -Dport=5556 -Denvironment=*iexplore launch-remote-control. If you Selenium Grid node is not on the same machine as the hub just add -DhubURL= -Dhost=
10. I hope that you find this really useful. I will publish a tutorial on running tests concurrently.
One last thing, if you are running your tests on your Grid and the machine dies and you want to remove it from your grid just run http://:4444/registration-manager/unregister?host=&port=&environment= in a browser and it will unregister it from the hub. This last bit of information will make life a lot easier for you. e.g http://localhost:4444/registration-manager/unregister?host=locahost&port=5556&environment=*iexplore


Saturday, July 2, 2011

Testing Selenium server support for Firefox

The quickest way to test if your selenium server is supporting the Firefox version installed on your machine is to start selenium server in an interactive mode. Let us walk through these steps.

1.Run Selenium server in interactive mode.To do this run the command:
java -jar selenium-server.jar -interactive -singleWindow
2.Start new selenium browser session using the command:
cmd=getNewBrowserSession&1=*firefox&2=http://www.google.com
3.If you see a line saying Preparing Firefox profile... and no progress beyond that, there is a high likelihood that the Firefox browser version you have is not supported by your version of selenium server jar you have. If you have Firefox 3.6 and selenium 1.0.1, the next section shows how to fix the problem.
4.If you don’t see a problem, run the following command:
cmd=open&1=http://www.google.com

If the browser starts and you see Google’s home page in it, your basic setup seems to be fine.

Pre-Requisites for setting up Automation Framework using selenium RC + test NG + Eclipse

It's very necessary to have compatible FF version + Selenium IDE support + Selenium RC

Step 1) Install FF ( I am on FF 3.5 )

Step 2) Install selenium IDE (FF plugin)
Note: You need to have the FF installed and then install the compatible selenium ide
FF 3.5 works fine with selenium ide 1.0.8

Download Selenium ide 1.0.8 from : http://release.seleniumhq.org/selenium-ide/

Step 3) Install JRE
Note:For the server to run you’ll need Java installed and the PATH environment variable correctly configured to run it from the console. You can check that you have Java correctly installed by running the following on a console:
java -version
If you get a version number (which needs to be 1.5 or later), you’re ready to start using Selenium RC.


Step 4) Install Eclipse [eclipse-SDK-3.6.2-win32]

Step 5) Download selenium RC (selenium-remote-control-1.0-dist) from http://release.seleniumhq.org/selenium-remote-control/
Note: You need to Add External jars - "selenium-server.jar" and "selenium-java-client-driver.jar" to your project.

Step 6) Install test NG


  • Navigate to Eclipse

  • Click “Install New Software..”

  • Click on Add

  • Enter Name – TestNG, Location - http://beust.com/eclipse

  • Select checkbox for TestNG and Click Next

  • Just follow instruction to complete installation